Compiling a JMSL Program on the Macintosh using Code Warrior
These instructions assume that you already know how to write simple Java
programs. If not, please learn a bit about Java, then come back this page.
Using CodeWarrior
If you are using CodeWarrior, read this doc (thanks to Jamie Forrest for providing this documentation).
Using MRJ
Apple provide a free Java Virtual Machine (JVM) and a Java Software Development
Kit (SDK) called MRJ. If you do not already have MRJ, you can download
it from here.
Information on MRJ can be found here.
Let's compile our first JMSL program, called "HelloJMSL.java".
Once you get past this step, you will be off and running.
-
Find the "javac" program in the MRJ SDK. You may wish to add it to the
Apple menu because you will use it often.
-
Double click on "javac".
-
Open the folder containing the JMSL release.
-
Specify the source file(s) by dragging the file "TestDev:HelloJMSL.java"
into the "Source files" rectangle in javac.
-
Specify the output directory where your compiled ".class" files will go
by dragging the "classes" folder into the "Destination folder:" rectangle
in javac.
-
Add JMSL to your classpath by dragging the "classes:jmsl.jar" file
to the "Classpath" rectangle in javac.
-
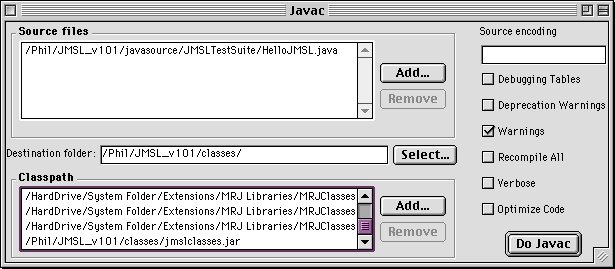
Hit the "Do Javac" button to compile. Any error messages will appear in
a new window. You may get depracation warnings, which you can safely ignore.
When you're ready to compile, "javac" should look like this (note that it will say TestDev instead of JMSLTestSuite):
Now let's run the program we just compiled. Apple provides
a program called JBindery that lets you create a double clickable icon
for Java programs.
-
Find the "JBindery" program in the MRJ SDK. You may wish to add it to the
Apple menu because you will use it often.
-
Double click on "JBindery".
-
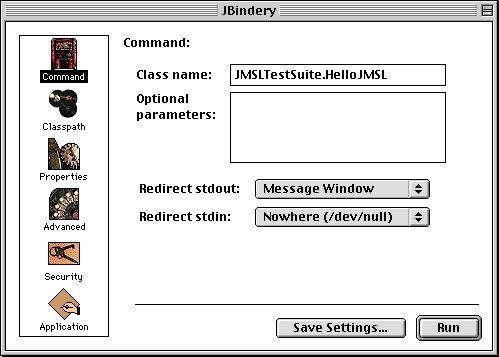
Click on the "Command" icon, then type in the name of the class you want
to run. In this case type "jmsltestSuite.HelloJMSL" (note that UpPEr and
LOweR case is important to Java. The screenshot below spells jmsltestsuite differently.
Use the case in the previous sentence for JMSLv103 distribution.
-
-
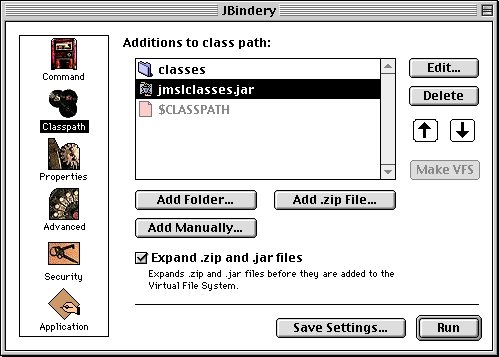
Click on the "Classpath" icon, then add JMSL to your classpath by dragging
the "classes:jmsl.jar" file to the rectangle in JBindery.
-
Now add your classes folder containing your program to the classpath by
dragging the "classes" folder to the rectangle in JBindery. Use the up
and down arrows to change the order so that the classes folder is on top
followed by jmsl.jar, followed by $CLASSPATH.
Note the screenshot below shows a different jar file name. The correct name is jmsl.jar
-
-
Click on the "Save Settings..." button, then uncheck the "Save as Application"
box and save these preferences as "runJMSL".
-
Now recheck the "Save as Application" box and save a double clickable app
called "HelloJMSL.app".
-
Now click the Run button to run the program. It may take a few seconds
to launch.
-
In the future, you will only have to double-click on "HelloJMSL.app" to
run the program. Double-click on "runJMSL" to get back into JBindery with
your old preferences.
Back